

Key Takeaways
- Install a continuous water-resistive barrier and air barrier across your entire building envelope, with properly detailed windows, doors, and drainage planes to prevent moisture damage.
- Control indoor humidity between 30–50% RH using exhaust fans, ventilation, and dehumidifiers to limit condensation in tight spaces.
- Inspect your roof, siding, flashing, gutters, and trailer frame at least twice per year and after major storms.
- Pay special attention to every penetration—vents, skylights, and plumbing—as these are the most common leak points.
- Investing in quality waterproofing membranes, tapes, and sealants during construction is far cheaper than repairing rot, mold, or structural issues later.
- Introduction: Why Waterproofing Matters in Tiny Houses
- Step 1: Plan Your Moisture Strategy Before You Build
- Step 2: Build a Continuous Water-Resistive and Air Barrier
- Step 3: Waterproof Roofs and Roof Edges First
- Step 4: Flash and Seal Windows and Doors Correctly
- Step 5: Design Effective Drainage Planes and Rainscreens
- Step 6: Control Indoor Humidity and Condensation
- Step 7: Gutters, Downspouts, and Site Drainage
- Step 8: Choose Moisture-Resistant Materials Inside and Out
- Step 9: Routine Inspections and Maintenance to Prevent Water Damage
- When to Call a Professional for Tiny House Waterproofing
- Conclusion: Keeping Your Tiny Home Dry for the Long Haul
- FAQ
- How often should I inspect my tiny house for water damage?
- Can I waterproof an existing tiny house after it’s already built?
- What relative humidity level is safe inside a tiny home?
- Do I really need a rainscreen on such a small building?
- What’s the difference between a vapor barrier and an air barrier in a tiny house?
Introduction: Why Waterproofing Matters in Tiny Houses
Tiny houses are vulnerable to water damage in ways conventional homes are not.
The compact size means rot spreads faster. High occupancy per square foot generates significant moisture—each resident produces about five pints of water daily through cooking, showering, and breathing. For mobile units, constant vibration creates cracks in sealants.
Waterproofing a tiny home means controlling three things: bulk water from rain and snow, water vapor from humidity and condensation, and air leaks that carry moisture into walls.
This guide walks you through building a tight water and air barrier, designing effective drainage planes, and maintaining your tiny home shell for years to come. Whether your house sits on a permanent foundation or a trailer, these principles apply.
Step 1: Plan Your Moisture Strategy Before You Build
Make waterproofing decisions at the design phase, not after your finished house is complete, and integrate them into your overall plan for how to build a tiny house.
Before construction:
- Sketch where your air barrier, water-resistive barrier, and drainage planes will live in your wall assembly
- Choose assemblies appropriate for your climate (cold, mixed-humid, or marine)
- Map all penetrations—windows, doors, skylights, vents, plumbing, electrical inlets—on drawings
- Create a checklist: roofing underlayment, WRB, air barrier, insulation, interior vapor retarder, gutters, and ground drainage
Mobile tiny houses must account for wind-driven rain and highway spray. Specify robust metal flashing and flexible sealants that tolerate vibration.
Step 2: Build a Continuous Water-Resistive and Air Barrier
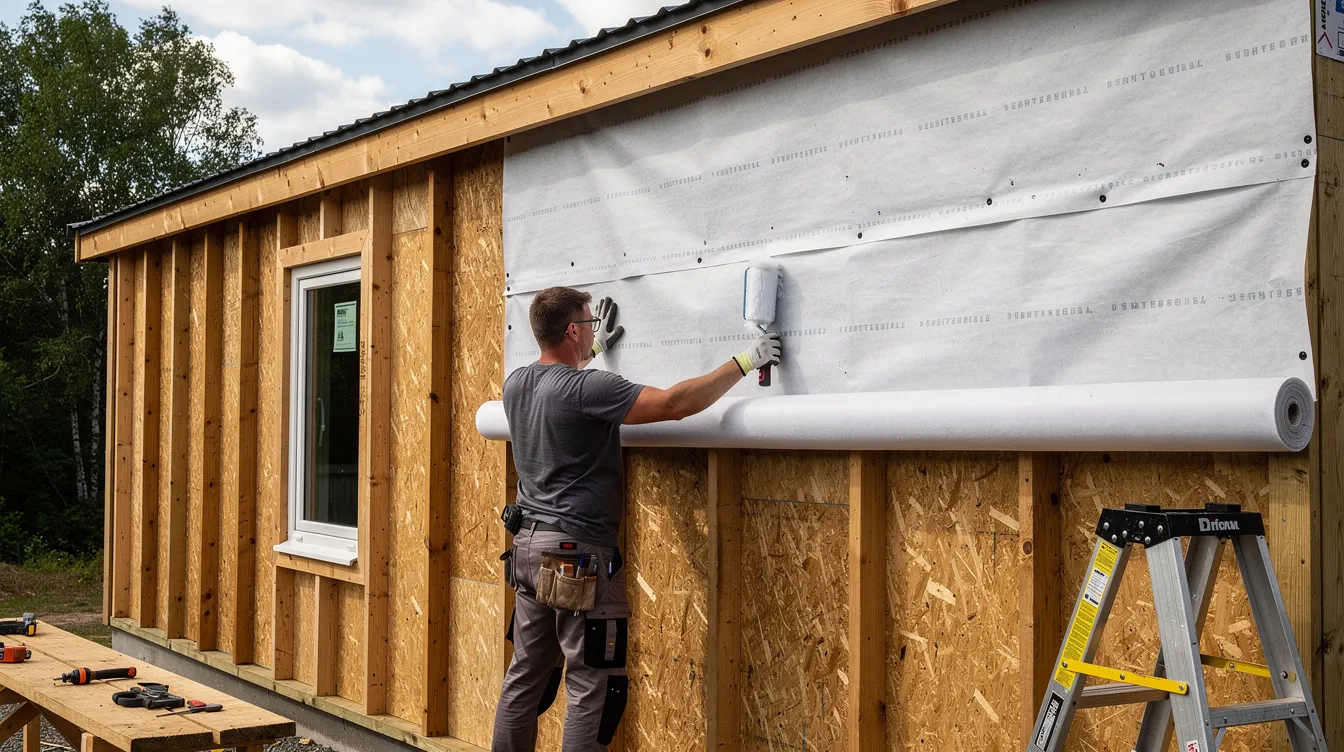
The building envelope is your first line of defense. A continuous water-resistive barrier (WRB) plus air barrier forms the foundation of waterproofing any tiny home.
Common WRB options:
- Mechanically fastened housewrap (nail-sealable, durable for road travel)
- Self-adhered membranes (higher cost but superior durability)
Seams must be lapped shingle-style (top over bottom) and taped with compatible acrylic or butyl tape. Specialized sealants, membranes, and coatings provide the best water protection for tiny living spaces.
Run the WRB continuously across exterior walls, around corners, and over rim joists. Avoid gaps behind decks, bump-outs, or overhangs.
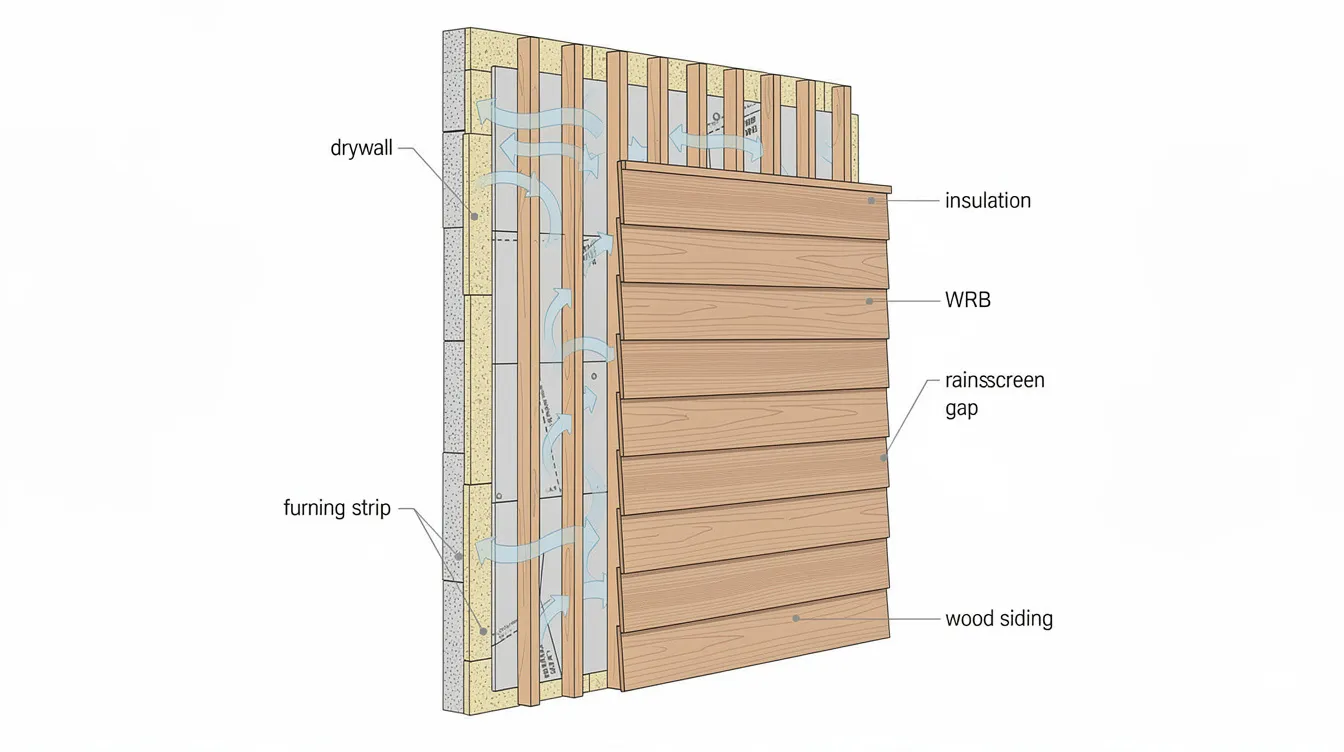
Example wall build-up: siding → rainscreen gap → WRB → sheathing → framing with insulation → interior finish. The air barrier typically lives at the sheathing or interior membrane.
Choosing and Detailing the Air Barrier
An air barrier stops unintended air movement. This also limits moisture-laden air from condensing inside walls and roofs.
Common strategies:
- Taped exterior sheathing
- Interior smart vapor retarder membrane
- Fully adhered exterior membranes
Sealing gaps and cracks in a tiny home is essential to prevent air leaks that allow moisture to enter, which can lead to mold and structural damage. Seal all joints with compatible tape or sealant at inside corners, rim joists, loft interfaces, and around mechanical chases.
Consider a blower door test after the shell is complete—under 3 ACH50 is an ambitious but achievable goal. Combining spray foam insulation with rigid board insulation like polyiso or XPS foam can block heat gain and loss while enabling ventilation to carry away any moisture buildup.
A tight air barrier increases the importance of planned ventilation, covered later.
Step 3: Waterproof Roofs and Roof Edges First
Most catastrophic water damage starts at the roof. Edges, valleys, and penetrations deserve extra attention.
Common roofing choices:
- Standing seam metal (excellent durability)
- High-quality asphalt shingles
- Single-ply membranes for low-slope sections
Install continuous roofing underlayment with peel-and-stick ice & water shield at eaves, valleys, and around penetrations. Roof sheathing joints and fasteners at eaves should be covered by underlayment and drip edge. Use overhangs that protect walls from direct rain.
Inspect and reseal roof fasteners, seams, and sealants at least once a year.
Sealing Vents, Skylights, and Other Penetrations
Every roof penetration—plumbing vents, flues, skylights, solar mounts, fan housings—is a likely leak point.
Proper flashing sequence:
- Underlayment lapped correctly
- Metal or factory flashings installed shingle-style
- Final roofing layered over the upper flange, not under it
Use high-temperature rated flashing boots for wood stoves. Apply butyl tape or gaskets under flanges—don’t rely only on caulk. Applying waterproof silicone caulk around wall fixtures and penetrations is crucial for maintaining the integrity of the home’s exterior and preventing water infiltration.
Check around vents and skylights for water stains or soft spots every spring and fall.

Step 4: Flash and Seal Windows and Doors Correctly
Windows and doors are the most common leak locations in tiny houses.
Key steps:
- Install a sloped sill pan under every window and door to collect and drain water
- Wrap WRB into the rough opening, integrated behind sill pan and side/head flashings
- Apply sealant on sides and top of window flanges, but leave the bottom unsealed or with strategic gaps for drainage
Using caulk to seal around windows and doors is a recommended practice, as it provides a continuous barrier against moisture intrusion.
Use high-quality weatherstripping and adjustable thresholds at doors to minimize both water intrusion and air leakage.
Choosing Windows and Doors for Tiny Homes
Select units with tested performance ratings for water penetration resistance and air leakage, and consider the best doors for tiny houses that balance space efficiency with durability.
Frame material options:
- Vinyl (stable, low maintenance)
- Fiberglass (strong, minimal expansion)
- Aluminum-clad wood (durable exterior, warm interior)
Choose units with deep flanges or integrated nailing fins for easier air barrier integration. Limit skylights unless they have robust factory flashing kits—they’re prone to leaks.
Properly installed high-performance windows reduce condensation at glass edges, lowering the risk of moisture damage to nearby trim.
Step 5: Design Effective Drainage Planes and Rainscreens
Tiny house walls shouldn’t try to be perfectly watertight. Instead, they should shed rain on the siding while providing drainage planes behind for any water that sneaks through, which is especially important for self-contained tiny homes designed for off-grid living.
Install vertical furring strips (3/8–3/4 inch thick) over the WRB to create an air gap behind cladding. This rainscreen gap allows gravity drainage and drying airflow—especially important for wood or fiber-cement siding in rainy climates.
Flashing at window heads, roof-to-wall intersections, and deck ledgers should terminate over the WRB and above the rainscreen gap. Add kick-out flashing where roofs meet walls.
Capillary Breaks and Protecting the Tiny House Base
Wood framing in contact with wet concrete, metal, or soil can wick moisture upward through capillary action.
Protection strategies:
- Use sill gaskets or peel-and-stick membranes between the floor system and trailer or foundation
- Seal the underside of the floor with coated plywood or rigid foam with taped seams
- Using a vapor barrier like Stego Wrap on the exterior side of concrete walls before backfilling helps prevent moisture vapor from moving through foundation walls
Elevate stationary tiny homes several inches above grade with gravel underneath. Avoid storing firewood or planters directly against the base where they trap moisture, and work with top micro house builders who understand proper moisture management details at the foundation interface.
Step 6: Control Indoor Humidity and Condensation
Even a perfectly sealed shell can experience moisture damage from the inside if humidity stays too high.
Proper ventilation is crucial in tiny house living to prevent moisture buildup, which can lead to mold and mildew issues. Monitoring humidity levels diligently is important to maintain optimal conditions in your tiny house, and using a hygrometer can help accurately measure moisture content.
Controlling interior moisture with continuous ventilation and exhaust fans can help keep indoor relative humidity near 30–50% to avoid condensation and mold growth.
Daily habits that help:
- Use lids when cooking
- Run bath fans during and after showers
- Hang wet clothes outside when possible
- Avoid unvented combustion heaters
Warm, well-insulated interior surfaces resist condensation, reducing long-term moisture damage risk.
Ventilation and Dehumidification for Tiny Homes
Inadequate ventilation in places like the bathroom and kitchen can create moisture buildup that leads to condensation and mold growth.
Install mechanical ventilation sized for small spaces:
- Continuous low-speed exhaust fan
- Through-wall ERV/HRV
- Timed bath and kitchen fans vented outdoors
Install bathroom fans that are powerful enough to exchange air volume 8-10 times per hour completely to manage indoor humidity effectively. Run exhaust fans for 20–45 minutes after each shower.
Use range hoods in the kitchen that vent outside at a minimum 100 CFM air flow rate to help control moisture levels. Strategically place dehumidifiers in moisture-prone areas like basements or closets to help maintain proper humidity levels.
Seal duct penetrations carefully into the air barrier so ventilation equipment doesn’t become a leak path.

Step 7: Gutters, Downspouts, and Site Drainage
Controlling rainwater once it leaves the roof is as important as keeping it out. Small footprints mean splash-back can soak walls quickly.
Essential elements:
- Continuous gutters sized for your roof area
- Downspouts discharging several feet from the base
- Splash blocks or drain lines moving water from wheels and leveling jacks
Grade ground around stationary tiny homes to slope away on all sides (2–4% over the first few feet). In rainy climates, consider French drains or gravel swales near skirting.
Step 8: Choose Moisture-Resistant Materials Inside and Out
Select exterior materials proven to resist rot and UV damage: metal roofing, fiber-cement, or well-detailed wood siding.
Using moisture-resistant materials like vinyl flooring, fiberglass insulation, and water-resistant paint can significantly reduce the likelihood of moisture-related problems in tiny homes, especially when paired with tiny house interior designs that maximize every square foot.
Closed-cell spray foam insulation provides superior thermal performance, airtightness, and moisture resistance compared to traditional fiberglass batting. Using insulation materials with high R-values and a vapor barrier helps control moisture diffusion, which is crucial for maintaining the longevity and durability of tiny homes, particularly in affordable tiny house designs where long-term value matters.
Use stainless steel or coated fasteners to prevent rust. Avoid rust-prone hardware that fails from repeated wetting cycles. Avoid absorbent materials like unsealed wood paneling directly against exterior walls unless backed by proper vapor control layers.
Step 9: Routine Inspections and Maintenance to Prevent Water Damage
Even the best details require ongoing maintenance.
Regular maintenance of your tiny home’s exterior is essential to prevent water intrusion and maintain its overall condition. Implementing a regular maintenance schedule allows you to identify and address moisture and mold issues promptly, preventing them from worsening over time.
Conducting regular inspections for leaks and signs of water damage, such as water stains or damp spots, is crucial for early detection and prevention of further issues.
Inspection schedule: Spring and fall, plus after major storms or long road trips.
Focus areas: Roof surface, sealants, flashing, gutters, siding, underside of floor, interior corners, and lofts.
Warning signs: Peeling paint, swollen trim, soft floors, musty odors, discoloration, visible mold.
Repair cracked caulk, loose flashing, and clogged gutters promptly. Keep a maintenance log with dates and observations.
When to Call a Professional for Tiny House Waterproofing
Some tasks are DIY-friendly: recaulking windows, cleaning gutters, installing a dehumidifier.
Call a professional for:
- Chronic roof leaks
- Hidden mold behind walls
- Structural rot at trailer connections
- Persistent foundation moisture
Seek contractors familiar with tiny homes rather than conventional houses. Building science consultants can review assemblies for correct WRB, air barrier, and insulation placement. Early professional intervention costs less than waiting until damage spreads.
Conclusion: Keeping Your Tiny Home Dry for the Long Haul
Waterproofing a tiny house means layering defenses: solid roof, continuous WRB and air barrier, effective drainage planes, and disciplined humidity control.
Design for drainage and drying rather than relying solely on sealants. Integrate waterproofing decisions into every phase—from framing to finishes, and consider how your waterproofing strategy supports the best tiny house designs for modern living, cute tiny house designs for your dream home, or other great tiny homes that redefine small-space living.
Consistent inspections and timely repairs keep your structure sound for years. Treat moisture management as ongoing stewardship, not a one-time construction step.
FAQ
How often should I inspect my tiny house for water damage?
Inspect at least twice per year (spring and fall) and after major storms or road trips. Focus on roofs, roof edges, gutters, window trim, floor underside, and interior corners. Take photos to track slow changes like staining or warping.
Can I waterproof an existing tiny house after it’s already built?
Yes, though it’s harder than starting fresh. Begin with highest-impact fixes: roof and window leaks, adding gutters, improving ventilation. Major wall rebuilds to add missing air barriers may require temporarily removing cladding.
What relative humidity level is safe inside a tiny home?
Aim for 30–50% most of the year. Brief spikes during cooking or showers are normal if vented quickly. Sustained RH above 60% increases mold risk, especially in concealed spaces. Monitor with a digital hygrometer.
Do I really need a rainscreen on such a small building?
Yes. Even tiny houses benefit from a drainage gap behind siding, especially in rainy or coastal climates. A simple 3/8–3/4 inch furring system adds minimal thickness but dramatically improves drying capacity.
What’s the difference between a vapor barrier and an air barrier in a tiny house?
An air barrier stops air movement and the moisture it carries. A vapor barrier slows moisture diffusion through materials. In many tiny homes, the same product (taped sheathing or smart membrane) serves both functions. Place vapor control on the warm-in-winter side in cold climates. Prioritize a continuous, well-sealed air barrier throughout the envelope.