

This tiny house insulation guide covers everything you need to know to keep your small home warm in winter, cool in summer, and energy efficient all year long. Insulating a tiny house is trickier than a standard home — wall cavities are shallow, space is limited, and weight matters if you’re on wheels. Choose the wrong material and you’ll deal with cold floors, sky-high heating bills, and moisture problems down the road. Get it right and your tiny home becomes a comfortable, low-cost place to live in any climate. In this guide, you’ll find the best insulation materials, recommended R-values, cost breakdowns, and practical tips for every part of your build.
- Key Takeaways
- What Is Tiny House Insulation and Why Does It Matter?
- What Are the Types of Insulation for Tiny Houses?
- R-Values Explained for Tiny Homes
- What's the Best Insulation for Tiny House Walls?
- What's the Best Insulation for Tiny House Floors?
- What's the Best Insulation for a Tiny House Roof or Ceiling?
- How Does Climate Zone Affect Your Tiny House Insulation Choices?
- DIY vs. Professional Tiny House Insulation Installation: Which Should You Choose?
- What Does Tiny House Insulation Actually Cost in 2026?
- Tips for Maximizing Energy Efficiency in a Tiny Home
- The Right Insulation Makes All the Difference
- Frequently Asked Questions About Tiny House Insulation
Key Takeaways
- R-values to target: R-13 to R-21 for walls, R-30+ for roofs, and R-19+ for floors — adjusted for your climate zone.
- Best performer per inch: Closed-cell spray foam (R-5.6 to R-8.0 per inch) fits tight cavities without sacrificing space.
- Don’t skip air sealing: Gaps around windows, doors, and penetrations can cut your insulation’s real-world performance by up to 30%.
- Weight matters on wheels: Fiberglass batts (0.5–1 lb/cu ft) keep trailer loads light; rock wool (4–8 lb/cu ft) adds significant weight.
- Budget upgrade: Switching from standard to high-performance insulation adds roughly $2,000 to a build but can cut heating and cooling costs by 25–40%.
What Is Tiny House Insulation and Why Does It Matter?
Tiny house insulation is a thermal barrier that slows the movement of heat between the inside and outside of your home. In a well-insulated tiny house, warm air stays in during winter and hot air stays out during summer — without running your heater or AC constantly.
The stakes are higher in a tiny home than a standard house. The surface-area-to-volume ratio is much larger, which means heat escapes faster. You’re also working with shallower wall cavities (typically 3.5 inches), limited ceiling height, and a floor that’s often exposed to open air under a trailer. Every decision counts.
Good insulation does three things:
- Controls heat transfer through walls, roof, and floor
- Manages moisture to prevent mold and structural damage
- Seals air leaks that quietly drain your energy budget
What Are the Types of Insulation for Tiny Houses?
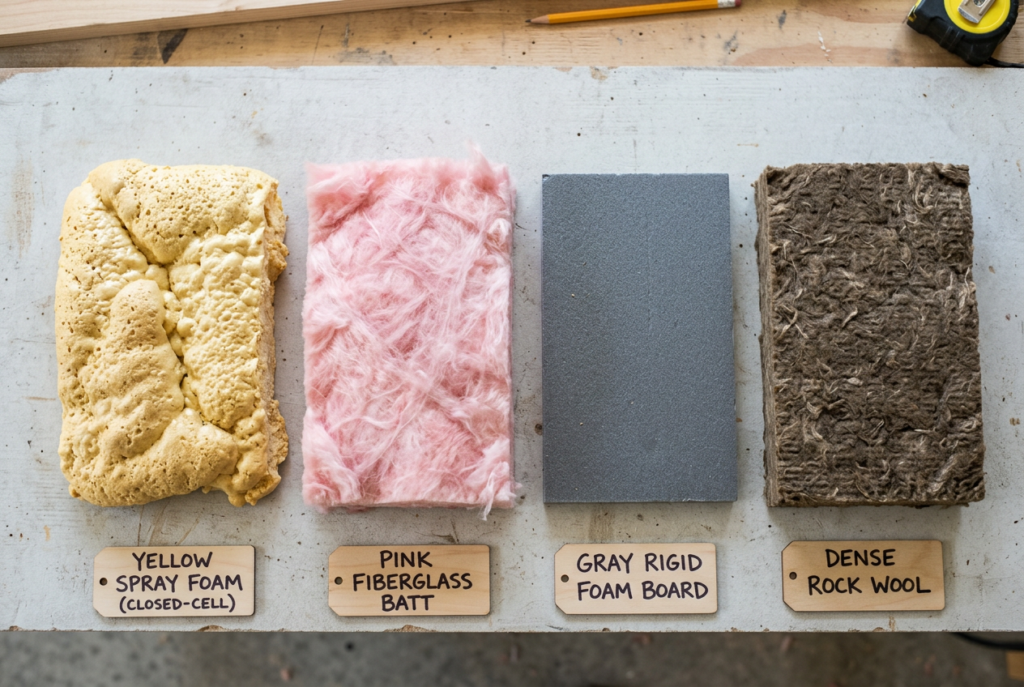
Several insulation materials work well in tiny homes. Each has different R-values, costs, weight, and installation requirements. Here’s a quick comparison:
| Material | R-Value per Inch | Best Use | DIY Friendly? |
|---|---|---|---|
| Closed-cell spray foam | R-5.6 to R-8.0 | Walls, roof, floor | No — needs pro |
| Open-cell spray foam | R-3.5 to R-3.7 | Walls, sound control | No — needs pro |
| Rigid foam board (XPS/EPS/Polyiso) | R-3.8 to R-6.5 | Exterior, floor, thermal bridges | Yes |
| Fiberglass batts | R-2.9 to R-3.8 | Walls, floor, roof | Yes |
| Rock wool / mineral wool | R-3.2 to R-4.1 | Walls, roof, fire-prone areas | Yes |
| Natural wool / recycled denim | R-3.5 to R-3.8 | Stationary tiny homes | Yes |
Closed-cell spray foam delivers the highest R-value per inch and doubles as an air and vapor barrier — a big advantage in tight spaces. Rigid foam boards are the go-to solution for reducing thermal bridging around metal trailer frames. Fiberglass batts keep costs and weight low. Rock wool adds fire resistance and sound dampening, making it a strong choice near wood stoves or metal roofing.
R-Values Explained for Tiny Homes
R-value measures how well insulation resists heat flow. The higher the number, the better the insulation. In a tiny house, high R-value per inch matters more than in a standard home because wall cavities are thin and road-legal width limits (8.5 feet) prevent you from thickening walls easily.
A standard 2×4 stud wall gives you just 3.5 inches of cavity depth. Here’s what that means in practice:
- Fiberglass batts in a 2×4 wall: around R-13
- Closed-cell spray foam in a 2×4 wall: R-19 to R-24
- Rock wool in a 2×4 wall: R-13 to R-15
Adding 1 to 2 inches of continuous exterior rigid foam pushes effective wall R-values into the mid-20s without touching interior space.
Keep in mind — R-value only measures conductive heat loss. Air leaks and moisture also affect real-world performance. Thermal bridging through metal studs and trailer frames can reduce effective R-value by 15 to 30 percent. For a deeper look at hitting the right numbers for every part of your build, check out this guide to tiny house insulation R-values.
What’s the Best Insulation for Tiny House Walls?
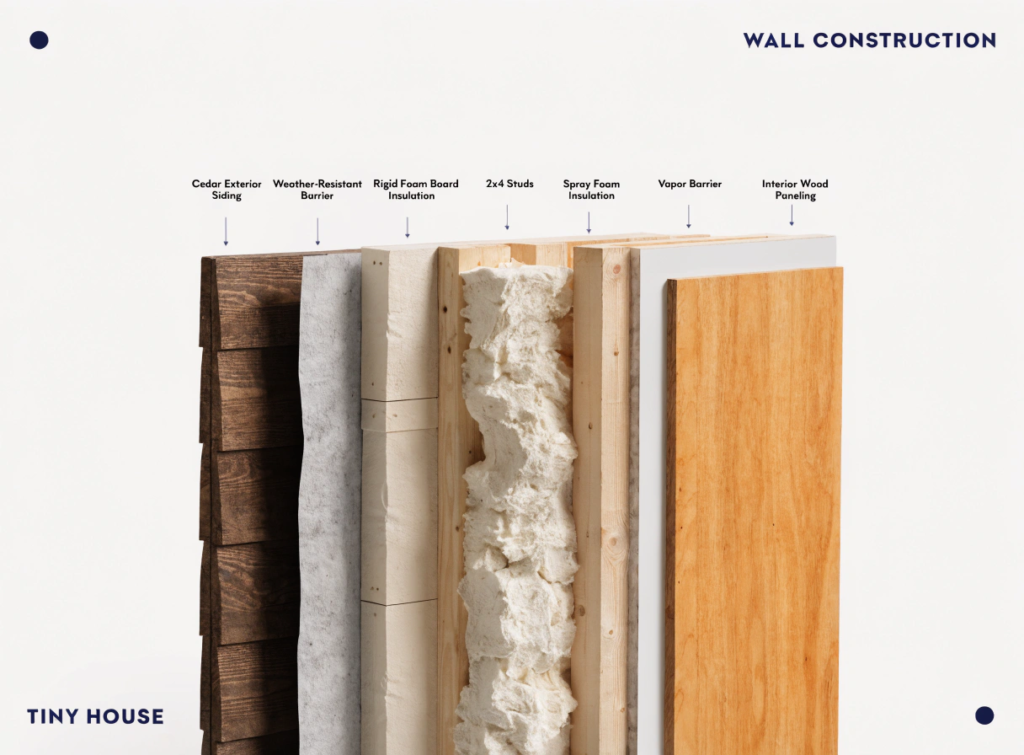
Closed-cell spray foam or a combination of fiberglass batts and exterior rigid foam board are the strongest choices for tiny house walls.
Most tiny house walls use 2×4 studs at 16 inches on center, leaving 3.5 inches of space. That’s shallow. Here’s how to make the most of it:
- Closed-cell spray foam fills the full cavity and hits R-19 to R-24 — the best thermal performance for that depth
- Fiberglass or rock wool batts are budget-friendly (R-13 to R-15) and DIY-friendly, but leave more room for air leaks
- Adding 1.5 inches of polyiso rigid foam on the outside raises effective wall R-value into the mid-20s and cuts thermal bridging through studs
If you’re building in a cold climate, aim for at least R-20 in your walls. In milder zones, R-13 to R-15 works fine with good air sealing.
What’s the Best Insulation for Tiny House Floors?
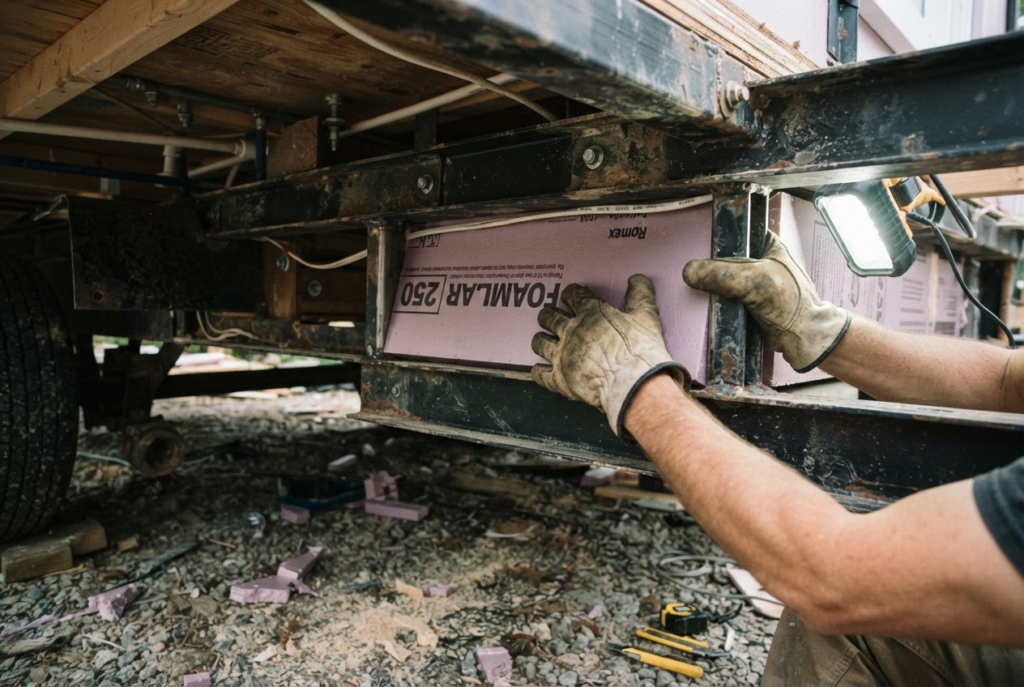
Rigid foam board cut between trailer flanges, combined with closed-cell spray foam around metal edges, is the most effective floor insulation approach for tiny houses on wheels.
A tiny house floor suspended over open air can lose 15 to 25 percent of your home’s total heat. Metal trailer frames and wheel wells create serious cold spots — thermal bridging at its worst.
Practical floor insulation options:
- Rigid foam boards cut to fit between trailer flanges (R-3.8 to R-6.5 per inch)
- Fiberglass or rock wool batts held up by mesh or wire
- Closed-cell spray foam applied to the underside for a seamless, moisture-resistant layer
Target R-19 minimum in mild climates. Cold climates need R-25 to R-30 or more. Protect any exposed foam on the underside with plywood, metal sheeting, or a spray-applied coating — road debris and moisture will degrade unprotected foam over time.
What’s the Best Insulation for a Tiny House Roof or Ceiling?
Closed-cell spray foam combined with exterior rigid foam board delivers the highest roof R-value within tight height limits.
Heat rises, which makes the roof your most critical insulation zone. But tiny houses face a hard constraint — legal road height is 13’6″, so there’s little room to stack thick insulation layers.
Roof insulation targets by climate:
- Warm zones (1–3): R-30 minimum
- Cold zones (4–6): R-38 to R-49
- Very cold zones (7–8): R-49 to R-60
Spray 3 inches of closed-cell foam in the rafter cavity (roughly R-21) and add 2 inches of rigid foam board above the deck for another R-10 to R-13. That combination reaches R-30 to R-35 without major height loss. For tighter budgets, 2×6 rafters filled with rock wool or fiberglass plus rigid foam on top can hit R-30 in mild climates.
How Does Climate Zone Affect Your Tiny House Insulation Choices?
Your climate zone determines which R-values you need in walls, roof, and floor — and which insulation materials make the most sense.
The U.S. Department of Energy divides the country into 8 climate zones (source). The colder the zone, the higher the R-value targets:
| Climate Zone | Walls | Roof | Floor |
|---|---|---|---|
| Warm (Zones 1–3) | R-13 to R-15 | R-30 | R-13 to R-19 |
| Mixed/Cold (Zones 4–6) | R-19 to R-21 | R-38 to R-49 | R-19 to R-30 |
| Very Cold (Zones 7–8) | R-20+ | R-49 to R-60 | R-30 to R-38 |
Someone building in Florida (Zone 2) doesn’t need the same insulation as someone in Minnesota (Zone 7). In warmer zones, vapor-open assemblies and lighter insulation work fine. In colder zones, closed-cell spray foam or robust combinations of rigid foam and batts are often necessary to hit target R-values in shallow cavities.
If you move your tiny house between climates, design for the coldest region you’ll spend time in.
DIY vs. Professional Tiny House Insulation Installation: Which Should You Choose?
Choose DIY installation for fiberglass batts and rigid foam boards. Hire a professional for spray foam.
Here’s how the options compare:
| Insulation Type | DIY Possible? | Skill Level | Notes |
|---|---|---|---|
| Fiberglass batts | Yes | Beginner | Wear protective gear; keep batts uncompressed |
| Rigid foam boards | Yes | Beginner | Cut to fit, tape seams, mechanically fasten |
| Rock wool batts | Yes | Beginner | Dense and stable; handle like fiberglass |
| Open-cell spray foam | No | Professional | Needs specialized equipment and mixing |
| Closed-cell spray foam | No | Professional | High pressure equipment; precise ratios required |
DIY insulation can save several hundred to a few thousand dollars in labor costs. However, poorly installed batts — compressed, gapped, or cut too small — can drop effective R-value by 20 to 40 percent. Take your time, follow manufacturer guidelines, and seal every gap with canned spray foam or caulk as you go.
For spray foam, the performance difference between a correct and incorrect application is significant. Always hire a licensed insulation contractor with tiny home or RV experience.
What Does Tiny House Insulation Actually Cost in 2026?
Upgrading from standard to high-performance insulation adds about $2,000 to a typical tiny house build — and can reduce heating and cooling costs by 25 to 40 percent.
Here’s a material-only price snapshot for 2026 (national averages sourced from HomeGuide):
| Material | Estimated Cost |
|---|---|
| Closed-cell spray foam | $0.90–$1.10 per board foot |
| Open-cell spray foam | $0.30–$0.60 per sq ft |
| Fiberglass batts | $0.30–$0.80 per sq ft |
| Rock wool / mineral wool | $1.00–$2.50 per sq ft |
| Rigid foam board | $0.25–$0.75 per sq ft |
| Recycled denim / cotton | $1.00–$2.00 per sq ft |
Fiberglass batts are the cheapest upfront, but they lead to higher energy bills over time. Closed-cell spray foam costs more to install but reduces monthly energy costs by roughly 30 percent — often paying for itself within 3 to 5 years of full-time use. In most climates, a well-insulated tiny house recoups its insulation premium through energy savings alone.
Tips for Maximizing Energy Efficiency in a Tiny Home
Good insulation is the foundation — but these additional steps make a real difference in real-world performance:
- Air seal before you insulate. Use canned foam, caulk, and tape to close every gap around windows, doors, outlets, and plumbing penetrations before installing insulation.
- Add continuous exterior rigid foam. Even 1 to 1.5 inches of foam board on the outside of walls cuts thermal bridging through studs and boosts effective R-value without thickening interior walls.
- Insulate wheel wells and metal trailer members. Metal conducts heat rapidly. Wrap exposed metal with rigid foam and tape joints carefully.
- Install a vapor barrier correctly. In cold climates, place the vapor retarder on the warm (interior) side. In hot-humid climates, use a more vapor-open wall assembly to let moisture escape.
- Choose double-pane, low-E windows. Target a U-factor of 0.28 or lower. Triple-pane is worth considering in very cold zones.
- Add insulated skirting in winter. For parked tiny houses, skirting around the base dramatically reduces floor heat loss during cold months.
- Use a thermal camera or smoke pen to find leaks. Test your tiny house before closing up walls to catch hidden air leaks early.
The Right Insulation Makes All the Difference
Insulation is one of the most important decisions in any tiny house build. Get it right and your home stays comfortable, your energy bills stay low, and moisture problems stay out. Get it wrong and you’ll spend years chasing cold drafts and paying too much to heat and cool a small space.
Start by matching your insulation targets to your climate zone. Then choose materials that fit your budget, weight limits, and installation skills. Focus on air sealing just as much as R-value — the two work together. A tiny house that’s well-insulated and well-sealed will outperform one with higher R-values but poor installation every time.
Use the resources and tables in this tiny house insulation guide to build a thermal envelope you can count on for years to come.
Frequently Asked Questions About Tiny House Insulation
What is the best insulation for a tiny house on wheels?
Closed-cell spray foam is the best performer for tiny houses on wheels. It delivers R-5.6 to R-8.0 per inch, resists moisture, and seals air leaks in one application. For DIY builds on a budget, rigid foam boards and fiberglass batts are practical alternatives — just pair them with thorough air sealing. Closed-cell spray foam is heavier per cubic foot than fiberglass but lighter than rock wool, making it a reasonable choice for weight-conscious builds.
How do I insulate a tiny house floor over a metal trailer?
Cut rigid foam boards to fit between the trailer flanges, then seal all edges and gaps with closed-cell spray foam. Add continuous foam around wheel wells and any exposed metal parts to reduce thermal bridging. Target R-19 minimum for mild climates and R-25 to R-30 for cold climates. Protect the underside from road debris with plywood, metal sheet, or a durable spray coating.
Do I need a vapor barrier in my tiny house?
Yes, in most climates. In cold climates (Zones 4–8), install a vapor retarder on the warm interior side of the wall. In hot-humid climates (Zones 1–3), use a more vapor-open assembly so moisture can escape outward. Closed-cell spray foam acts as its own vapor retarder. If you’re using fiberglass or rock wool batts, add a separate vapor barrier layer appropriate to your climate.
Can I insulate a tiny house myself?
Yes, for fiberglass batts, rock wool, and rigid foam boards. These materials are beginner-friendly and only require basic tools. Spray foam — both open and closed-cell — requires professional equipment and precise chemical ratios. Hiring a professional for spray foam is strongly recommended to achieve the correct R-value and avoid costly application errors.
How much does it cost to insulate a 200-square-foot tiny house?
Total insulation costs vary by material and climate. Fiberglass batts are the most affordable option, while closed-cell spray foam is the most expensive. For a 200-square-foot build, material costs alone typically range from $500 to $3,000 depending on the materials chosen. High-performance assemblies using spray foam and rigid foam board add roughly $2,000 over a standard fiberglass build but can cut long-term energy costs by 25 to 40 percent.